《iOS球形波浪加载进度控件-HcdProcessView》这篇文章已经展示了我在项目中编写的一个球形进度加载控件HcdProcessView,这篇文章我要简单介绍一下我的制作过程。
思路
首先我放弃了使用通过改变图片的位置来实现上面的动画效果,虽然这样也可以实现如上的效果,但是从性能和资源消耗上来说都不是最好的选择。这里我采用了通过上下文(也就是CGContextRef)来绘制这样的效果,大家对它应该并不陌生,它既可以绘制直线、曲线、多边形圆形以及各种各样的几何图形。
具体步骤
我们可以将上面的复杂图形拆分成如下几步:
- 绘制最外面的一圈刻度尺
- 绘制表示进度的刻度尺
- 绘制中间的球形加载界面
绘制刻度尺
如果你先要在控件中绘制自己想要的图形,你需要重写UIView的drawRect方法:
1
2
3
4
5
| - (void)drawRect:(CGRect)rect
{
CGContextRef context = UIGraphicsGetCurrentContext();
[self drawScale:context];
}
|
在drawRect方法中,我们先画出了刻度尺的图形,刻度尺是由一圈短线在一个圆内围成的一个圆。
1
2
3
4
5
6
7
8
9
10
11
12
13
14
15
16
17
18
19
20
21
22
23
24
25
26
27
28
29
30
31
32
33
|
- (void)drawScale:(CGContextRef)context {
CGContextSetLineWidth(context, _scaleDivisionsWidth);
CGContextTranslateCTM(context, fullRect.size.width / 2, fullRect.size.width / 2);
CGContextSetStrokeColorWithColor(context, [UIColor colorWithRed:0.655 green:0.710 blue:0.859 alpha:1.00].CGColor);
for (int i = 0; i < _scaleCount; i++) {
CGContextMoveToPoint(context, scaleRect.size.width/2 - _scaleDivisionsLength, 0);
CGContextAddLineToPoint(context, scaleRect.size.width/2, 0);
CGContextStrokePath(context);
CGContextRotateCTM(context, 2 * M_PI / _scaleCount);
}
CGContextSetStrokeColorWithColor(context, [UIColor colorWithRed:0.694 green:0.745 blue:0.867 alpha:1.00].CGColor);
CGContextSetLineWidth(context, 0.5);
CGContextAddArc (context, 0, 0, scaleRect.size.width/2 - _scaleDivisionsLength - 3, 0, M_PI* 2 , 0);
CGContextStrokePath(context);
CGContextTranslateCTM(context, -fullRect.size.width / 2, -fullRect.size.width / 2);
}
|
这里需要用到两个东西一个是CGContextAddArc,一个是CGContextAddLineToPoint。创建圆弧的方法有两种一种是CGContextAddArc,一种是CGContextAddArcToPoint,这里画的圆比较简单所以用的是CGContextAddArc,CGContextAddArcToPoint在后面也会用到(我会在用到的地方详解)。
CGContextAddArc
1
2
3
4
5
6
7
8
9
| void CGContextAddArc (
CGContextRef c,
CGFloat x,
CGFloat y,
CGFloat radius,
CGFloat startAngle,
CGFloat endAngle,
int clockwise
);
|
这里需要创建一个完整的圆,那么 开始弧度就是0 结束弧度是 2PI, 因为圆周长是 2PIradius。函数执行完后,current point就被重置为(x,y)。CGContextTranslateCTM(context, fullRect.size.width / 2, fullRect.size.width / 2);已经将current point移动到了(fullRect.size.width / 2, fullRect.size.width / 2)。
CGContextAddLineToPoint
1
2
3
4
5
| void CGContextAddLineToPoint (
CGContextRef c,
CGFloat x,
CGFloat y
);
|
创建一条直线,从current point到 (x,y)
然后current point会变成(x,y)。
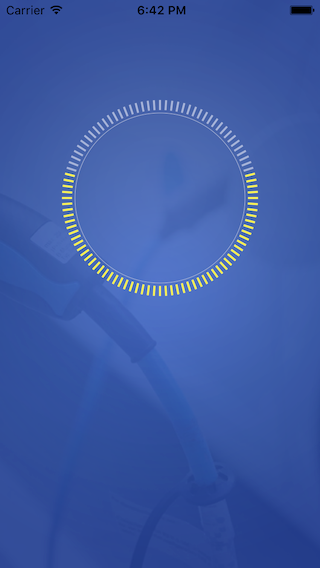
由于短线不连续,所以通过for循环来不断画短线,_scaleCount代表的是刻度尺的个数,每次循环先将current point移动到(scaleRect.size.width/2 - _scaleDivisionsLength, 0)点,_scaleDivisionsLength代表短线的长度。绘制完短线后将前面绘制完成的图形旋转一个刻度尺的角度CGContextRotateCTM(context, 2 * M_PI / _scaleCount);,将最终的绘制渲染后就得到了如下的刻度尺:

刻度尺上的进度绘制
首先在drawRect中添加drawProcessScale方法。
1
2
3
4
5
6
| - (void)drawRect:(CGRect)rect
{
CGContextRef context = UIGraphicsGetCurrentContext();
[self drawScale:context];
[self drawProcessScale:context];
}
|
然后在drawProcessScale方法中实现左右两部分的刻度尺进度绘制。
1
2
3
4
5
6
7
8
9
10
11
12
13
14
15
16
17
18
19
20
21
22
23
24
25
26
27
28
29
30
31
32
33
34
35
36
37
38
|
- (void)drawProcessScale:(CGContextRef)context {
CGContextSetLineWidth(context, _scaleDivisionsWidth);
CGContextTranslateCTM(context, fullRect.size.width / 2, fullRect.size.width / 2);
CGContextSetStrokeColorWithColor(context, [UIColor colorWithRed:0.969 green:0.937 blue:0.227 alpha:1.00].CGColor);
int count = (_scaleCount / 2 + 1) * currentPercent;
CGFloat scaleAngle = 2 * M_PI / _scaleCount;
for (int i = 0; i < count; i++) {
CGContextMoveToPoint(context, 0, scaleRect.size.width/2 - _scaleDivisionsLength);
CGContextAddLineToPoint(context, 0, scaleRect.size.width/2);
CGContextStrokePath(context);
CGContextRotateCTM(context, scaleAngle);
}
CGContextRotateCTM(context, -count * scaleAngle);
for (int i = 0; i < count; i++) {
CGContextMoveToPoint(context, 0, scaleRect.size.width/2 - _scaleDivisionsLength);
CGContextAddLineToPoint(context, 0, scaleRect.size.width/2);
CGContextStrokePath(context);
CGContextRotateCTM(context, -scaleAngle);
}
CGContextTranslateCTM(context, -fullRect.size.width / 2, -fullRect.size.width / 2);
}
|
绘制完后效果如下:
水的波浪效果绘制
终于到了最主要也是最难的效果绘制了,对于带有波浪不断滚动的效果是采用NSTimer来不断绘制每一帧图形实现的,现在简单介绍下每一帧的绘制方法。
首先在drawRect中添加drawWave方法,
1
2
3
4
5
6
7
| - (void)drawRect:(CGRect)rect
{
CGContextRef context = UIGraphicsGetCurrentContext();
[self drawScale:context];
[self drawProcessScale:context];
[self drawWave:context];
}
|
drawWave中实现如下方法:
1
2
3
4
5
6
7
8
9
10
11
12
13
14
15
16
17
18
19
20
21
22
23
24
25
26
27
28
29
30
31
32
33
34
35
36
37
38
39
40
41
42
43
44
45
46
47
48
49
50
51
52
53
54
55
56
57
58
59
60
61
62
63
64
65
66
67
68
69
70
71
72
73
74
75
76
77
78
79
80
81
82
83
84
85
86
87
88
89
90
91
92
93
94
95
96
97
98
99
100
101
102
103
104
105
106
107
|
- (void)drawWave:(CGContextRef)context {
CGMutablePathRef frontPath = CGPathCreateMutable();
CGMutablePathRef backPath = CGPathCreateMutable();
CGContextSetLineWidth(context, 1);
CGContextSetFillColorWithColor(context, [_frontWaterColor CGColor]);
CGFloat offset = _scaleMargin + _waveMargin + _scaleDivisionsWidth;
float frontY = currentLinePointY;
float backY = currentLinePointY;
CGFloat radius = waveRect.size.width / 2;
CGPoint frontStartPoint = CGPointMake(offset, currentLinePointY + offset);
CGPoint frontEndPoint = CGPointMake(offset, currentLinePointY + offset);
CGPoint backStartPoint = CGPointMake(offset, currentLinePointY + offset);
CGPoint backEndPoint = CGPointMake(offset, currentLinePointY + offset);
for(float x = 0; x <= waveRect.size.width; x++){
frontY = a * sin( x / 180 * M_PI + 4 * b / M_PI ) * amplitude + currentLinePointY;
CGFloat frontCircleY = frontY;
if (currentLinePointY < radius) {
frontCircleY = radius - sqrt(pow(radius, 2) - pow((radius - x), 2));
if (frontY < frontCircleY) {
frontY = frontCircleY;
}
} else if (currentLinePointY > radius) {
frontCircleY = radius + sqrt(pow(radius, 2) - pow((radius - x), 2));
if (frontY > frontCircleY) {
frontY = frontCircleY;
}
}
if (fabs(0 - x) < 0.001) {
frontStartPoint = CGPointMake(x + offset, frontY + offset);
CGPathMoveToPoint(frontPath, NULL, frontStartPoint.x, frontStartPoint.y);
}
frontEndPoint = CGPointMake(x + offset, frontY + offset);
CGPathAddLineToPoint(frontPath, nil, frontEndPoint.x, frontEndPoint.y);
backY = a * cos( x / 180 * M_PI + 3 * b / M_PI ) * amplitude + currentLinePointY;
CGFloat backCircleY = backY;
if (currentLinePointY < radius) {
backCircleY = radius - sqrt(pow(radius, 2) - pow((radius - x), 2));
if (backY < backCircleY) {
backY = backCircleY;
}
} else if (currentLinePointY > radius) {
backCircleY = radius + sqrt(pow(radius, 2) - pow((radius - x), 2));
if (backY > backCircleY) {
backY = backCircleY;
}
}
if (fabs(0 - x) < 0.001) {
backStartPoint = CGPointMake(x + offset, backY + offset);
CGPathMoveToPoint(backPath, NULL, backStartPoint.x, backStartPoint.y);
}
backEndPoint = CGPointMake(x + offset, backY + offset);
CGPathAddLineToPoint(backPath, nil, backEndPoint.x, backEndPoint.y);
}
CGPoint centerPoint = CGPointMake(fullRect.size.width / 2, fullRect.size.height / 2);
CGFloat frontStart = [self calculateRotateDegree:centerPoint point:frontStartPoint];
CGFloat frontEnd = [self calculateRotateDegree:centerPoint point:frontEndPoint];
CGPathAddArc(frontPath, nil, centerPoint.x, centerPoint.y, waveRect.size.width / 2, frontEnd, frontStart, 0);
CGContextAddPath(context, frontPath);
CGContextFillPath(context);
CGContextSaveGState(context);
CGContextDrawPath(context, kCGPathStroke);
CGPathRelease(frontPath);
CGFloat backStart = [self calculateRotateDegree:centerPoint point:backStartPoint];
CGFloat backEnd = [self calculateRotateDegree:centerPoint point:backEndPoint];
CGPathAddArc(backPath, nil, centerPoint.x, centerPoint.y, waveRect.size.width / 2, backEnd, backStart, 0);
CGContextSetFillColorWithColor(context, [_backWaterColor CGColor]);
CGContextAddPath(context, backPath);
CGContextFillPath(context);
CGContextSaveGState(context);
CGContextDrawPath(context, kCGPathStroke);
CGPathRelease(backPath);
}
|
上面的代码较长,可能也比较难以理解。下面我将会对上述代码简单解读一下,已前浪为例(前浪和后浪的实现方式基本一样,只是两个浪正余弦函数不一样而已)。两个浪都是由一条曲线和和一个圆弧构成的封闭区间,曲线的x区间为[0, waveRect.size.width],y值坐标为frontY = a * sin( x / 180 * M_PI + 4 * b / M_PI ) * amplitude + currentLinePointY;(currentLinePointY为偏移量),通过for循环自增x,计算出y的位置来不断CGPathAddLineToPoint绘制出一条曲线,这就构成了波浪的曲线。然后我们需要根据波浪曲线的起始点和结束点以及圆心点(fullRect.size.width / 2, fullRect.size.height / 2),来绘制一段封闭的圆弧。
这里就需要用到CGPathAddArc方法;CGPathAddArc方法和CGContextAddArc类似。需要先计算出点波浪的起始点和结束点分别与圆心之间的夹角。知道两点计算夹角的方式如下:
1
2
3
4
5
6
7
8
9
10
11
12
13
14
15
16
17
18
19
20
21
22
23
24
25
26
27
28
29
30
31
32
33
34
35
|
- (CGFloat)calculateRotateDegree:(CGPoint)centerPoint point:(CGPoint)point {
CGFloat rotateDegree = asin(fabs(point.y - centerPoint.y) / (sqrt(pow(point.x - centerPoint.x, 2) + pow(point.y - centerPoint.y, 2))));
if (point.y > centerPoint.y) {
if (point.x >= centerPoint.x) {
rotateDegree = rotateDegree;
}
else {
rotateDegree = M_PI - rotateDegree;
}
} else
{
if (point.x <= centerPoint.x)
{
rotateDegree = M_PI + rotateDegree;
}
else
{
rotateDegree = 2 * M_PI - rotateDegree;
}
}
return rotateDegree;
}
|
波浪绘制的相关判断
由于曲线x区间是[0, waveRect.size.width],y值是根据公式frontY = a * sin( x / 180 * M_PI + 4 * b / M_PI ) * amplitude + currentLinePointY;计算出来的,但是最终构成的波浪是一个球形的,所以对于计算出来的y值坐标,我们需要判断它是否在圆上,如果不在圆上,我们应该将它移到圆上。
判断分为两种情况:
currentLinePointY<fullRect.size.height / 2
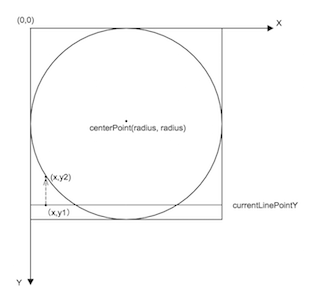
当currentLinePointY<fullRect.size.height / 2时,已知点的坐标x,根据公式y1 = a * sin( x / 180 * M_PI + 4 * b / M_PI ) * amplitude + currentLinePointY;算出来的点位置为(x, y1),而在圆上点坐标为x的点的位置在(x,y2),如果y1<y2 则最终应该放到波浪上的点为 (x,y2)。

currentLinePointY>fullRect.size.height / 2
同理当currentLinePointY>fullRect.size.height / 2时,已知点的坐标x,根据公式y1 = a * sin( x / 180 * M_PI + 4 * b / M_PI ) * amplitude + currentLinePointY;算出来的点位置为(x, y1),而在圆上点坐标为x的点的位置在(x,y2),如果y1>y2 则最终应该放到波浪上的点为 (x,y2)。
其中判断的代码如下:
1
2
3
4
5
6
7
8
9
10
11
12
13
14
| frontY = a * sin( x / 180 * M_PI + 4 * b / M_PI ) * amplitude + currentLinePointY;
CGFloat frontCircleY = frontY;
if (currentLinePointY < radius) {
frontCircleY = radius - sqrt(pow(radius, 2) - pow((radius - x), 2));
if (frontY < frontCircleY) {
frontY = frontCircleY;
}
} else if (currentLinePointY > radius) {
frontCircleY = radius + sqrt(pow(radius, 2) - pow((radius - x), 2));
if (frontY > frontCircleY) {
frontY = frontCircleY;
}
}
|
其中当currentLinePointY < radius 时,y2=radius - sqrt(pow(radius, 2) - pow((radius - x), 2));
当currentLinePointY > radius时,y2=radius + sqrt(pow(radius, 2) - pow((radius - x), 2));
这样就构成了一个如下的效果:
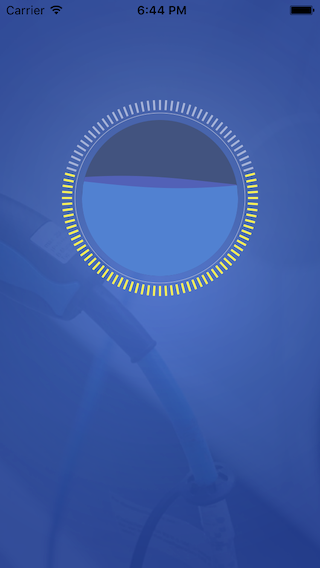
然后通过Timer不断的改变a、b的值就得到了我想要的动画效果。
Github地址:https://github.com/Jvaeyhcd/HcdProcessView